Outlook Client Install: Difference between revisions
Acs300Admin (talk | contribs) No edit summary |
Acs300Admin (talk | contribs) No edit summary |
||
| Line 8: | Line 8: | ||
2. Open https://aka.ms/olksideload in a browser ( and login to your Microsoft 365 Acocunt if needed) | 2. Open https://aka.ms/olksideload in a browser ( and login to your Microsoft 365 Acocunt if needed) | ||
[[File:Sage 300 Addins for microsoft outlook.png]] | [[File:Sage 300 Addins for microsoft outlook.png|500px]] | ||
3. Follow the steps in the image to "Add from file". Select the file download in step 1. | 3. Follow the steps in the image to "Add from file". Select the file download in step 1. | ||
| Line 14: | Line 14: | ||
4. In the prompt click Install | 4. In the prompt click Install | ||
[[File:Sage 300 Install outlook addin.png]] | [[File:Sage 300 Install outlook addin.png|500px]] | ||
5. The add in should show as installed correctly. | 5. The add in should show as installed correctly. | ||
[[File:Sage 300 outlook add in installed.png]] | [[File:Sage 300 outlook add in installed.png|500px]] | ||
6. Close the dialog and refresh Outlook in your browser. | 6. Close the dialog and refresh Outlook in your browser. | ||
Revision as of 11:35, 8 April 2024
We are preparing to submit the app to the Microsoft 365 add-in store. Until it is published there you have to do the following.
1. Click https://update.crmtogether.com/appac300-manifest.xml to download the Manifest file to your machine. The file should save to your "downloads" folder. If your browser prompts to open this file just ignore this.
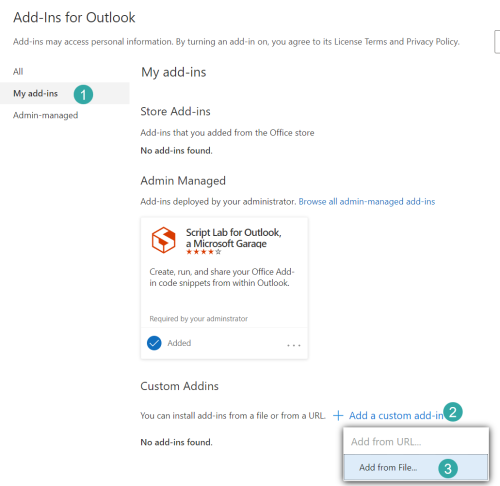
2. Open https://aka.ms/olksideload in a browser ( and login to your Microsoft 365 Acocunt if needed)
3. Follow the steps in the image to "Add from file". Select the file download in step 1.
4. In the prompt click Install
Error creating thumbnail: Unable to save thumbnail to destination
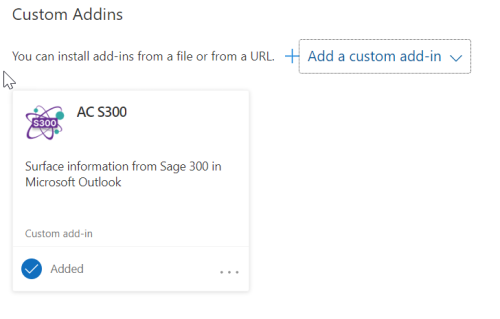
5. The add in should show as installed correctly.
6. Close the dialog and refresh Outlook in your browser.
7. Select an Email. Click on the ... button and select "Customize Actions" from the menu.
File:Customize outlook add in display.png
8. Select the AC S300 add in from the display and check the box and click Save
Error creating thumbnail: Unable to save thumbnail to destination
9. The icon will show up in the email area (You may need to refresh the Outlook screen for it to appear). Click the icon to open the Task Pane.
Error creating thumbnail: Unable to save thumbnail to destination
10. Within the task pane configure the connection.
Error creating thumbnail: Unable to save thumbnail to destination
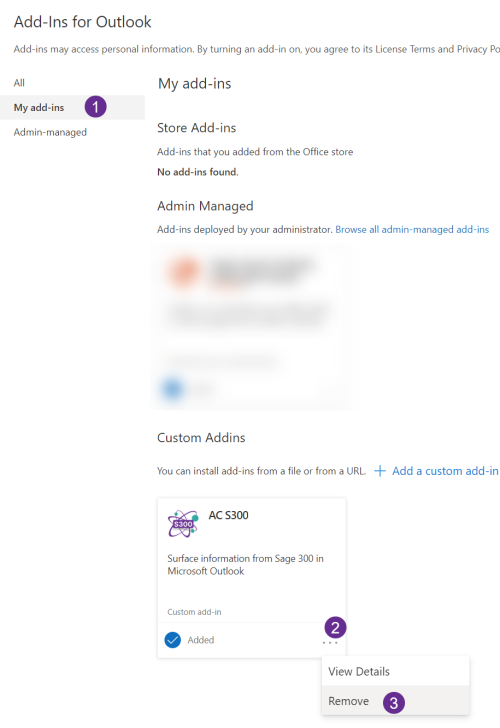
To uninstall just open the 'Add-ins for Outlook' page again and select either
My Add-ins
or
Admin-Managed
(Depending on how the app was deployed)


